
Install Ansible Tower on OpenShift 4.x on your Laptop
- Requirements
- OpenShift Resources
- Part 1 - Install Openshift
- Part 2 - Install Ansible Tower
- Part 3 - Access Ansible Tower
- Adjusting Ansible Tower Resource Requirements
- Remote Shell
- Extras
- Upgrading
- References
Red Hat Ansible Tower is now supported on the Red Hat OpenShift platform. In order to get your hands dirty with the installation process and gain experience, follow these steps to install OpenShift on your laptop or workstation and then additionally install Ansible Tower.
Previously, with OpenShift 3.x we would use a product called Minishift to install OpenShift on our laptop however this is not available for OpenShift 4.x.
To run Red Hat OpenShift 4.x on your laptop we will need to use a new product called Red Hat CodeReady Containers that uses a single node configuration on your laptop. Simply put, it uses hypervisor software to spin up a virtual machine containing a single node OpenShift cluster. The virtual machine is managed solely through the crc command line tool. The OpenShift cluster is managed through the standard oc command line tool as well as the GUI interface.
Red Hat CodeReady Containers creates a regular OpenShift installation with the following notable differences:
- The CodeReady Containers OpenShift cluster is ephemeral and is not intended for production use.
- It uses a single node which behaves as both a master and worker node.
- It disables the machine-config and monitoring Operators by default.
- These disabled Operators cause the corresponding parts of the web console to be non-functional.
- For the same reason, there is no upgrade path to newer OpenShift versions.
- The OpenShift instance runs in a virtual machine. This may cause other differences, particularly with external networking.
Requirements
CodeReady Containers (CRC) has the following minimum requirements:
- 4 vCPUs
- 9 GB RAM (9216 MiB)
- 35 GB of storage
- Operating Systems
- Microsoft Windows: Windows 10 Fall Creators Update (version 1709) or newer
- MacOS: 10.12 Sierra or newer
- Linux: Red Hat Enterprise Linux 7.5, CentOS 7.5, or latest two stable Fedora releases
Ansible Tower has the following minimum requirements:
- 3 vCPUs (per pod)
- 6 GB RAM (per pod)
- 20 GB of storage
- OpenShift 3.11 or higher
PostgreSQL has the following minimum requirements:
- 1 vCPUs
- 500 MiB RAM
- 20 GB of storage (due to Ansible Tower requirements)
- OpenShift 3.11 or higher
CRC creates a virtual machine with an OpenShift installation that already consumes a lot of the available resources. As a result, it is not possible to install Ansible Tower and PostgreSQL within the OpenShift cluster using the default resource settings (cpu and memory) as they were insufficient. With the default settings OpenShift cannot start the tower pod and shows a Pending status with the reason stating “0/1 nodes are available: 1 Insufficient cpu, 1 Insufficient memory.” To check this on your laptop, after Tower installer is completed use the following commands:
oc project tower
oc get pods
oc describe pod ansible-tower | grep Warning
Therefore, the recommended minimum resource settings for CRC to handle the Ansible Tower installation are the following:
- 5 vCPUs
- 15 GB RAM (14305 MiB)
We will use these settings going forward but feel free to increase them to handle even more demands from Ansible Tower and PostreSQL. This was the minimum needed to get the Ansible Tower login and be able to navigate around the application. One way to avoid resource demands might be to spin up PostgreSQL outside of OpenShift using a Docker image or external system. However, the PostgreSQL pod is not really very demanding on resources. It is the Ansible Tower pod that has the most demand on the resources. Therefore, I would recommend scaling down the base OpenShift installation so that it releases more resources for Ansible Tower.
OpenShift Resources
For those that may not understand how OpenShift resources work, the folowing explanation might help. Skip this section if you already have an understanding.
OpenShift clusters can have one or more nodes, but in this case with CodeReady Containers we only have one node. Each node runs one or more pods that are running one or more containers inside them. Each container consumes compute resources from that node, which are measurable quantities that can be requested, allocated, and consumed.
When authoring a pod configuration file, you can optionally specify how much CPU and memory (RAM) each container needs in order to better schedule pods in the cluster and ensure satisfactory performance.
- CPU is measured in units called millicores. Each node in a cluster inspects the operating system to determine the amount of CPU cores on the node, then multiplies that value by 1000 to express its total capacity. For example, if a node has 2 cores, the node’s CPU capacity would be represented as 2000m. If you wanted to use 1/10 of a single core, it would be represented as 100m.
- Memory is measured in bytes. In addition, it may be used with SI suffices (E, P, T, G, M, K) or their power-of-two-equivalents (Ei, Pi, Ti, Gi, Mi, Ki).
To help you understand better, the meaning of memory and cpu resource units in OpenShift can be found here.
Part 1 - Install Openshift
For the first part, let’s prepare and install OpenShift on your laptop using the CRC tool.
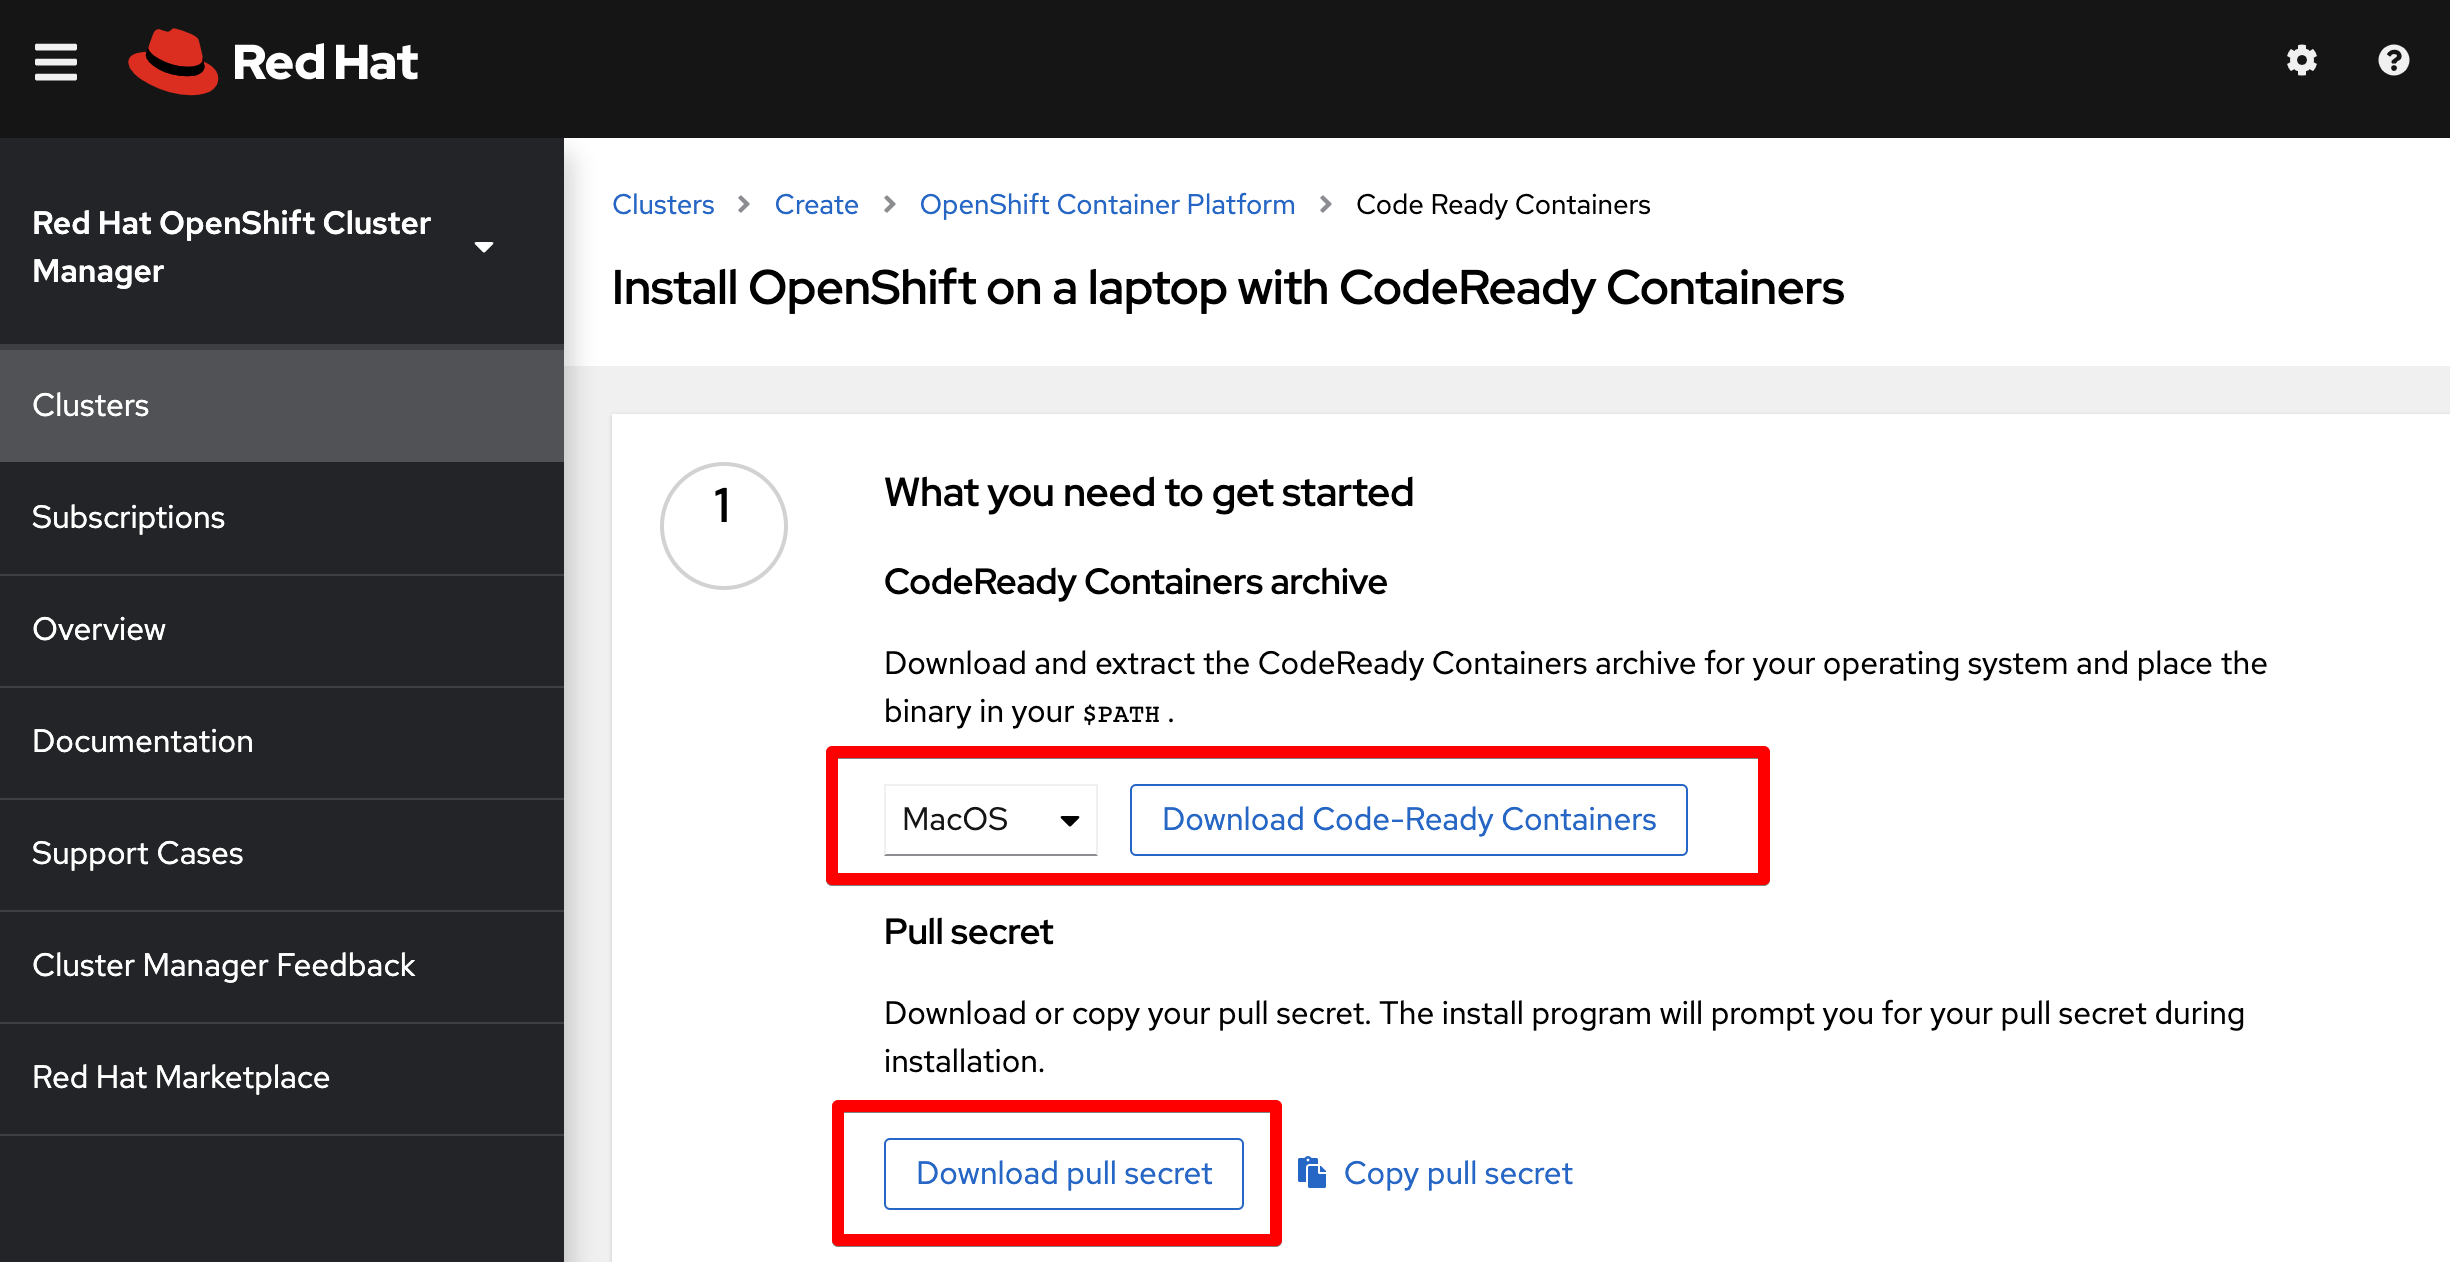
- Download the
CRC tooland thepull secretfrom the Red Hat Developer website. It is important to download it from here (as opposed to other mirrors) as you will also need the “pull secret” file to perform the installation. - Extract the contents of the archive to reveal the
crcbinary file - Move the
crcbinary file to a location in yourPATH - For Mac laptops:
- Run
crcfrom command line, Mac security will prevent it from running, click OK - Go to System Prefs -> Security -> General and you’ll notice a warning about
crc; clickAllow - Run
crcfrom command line again and window pops up warning again but allowing you to “Open” the app
- Run
- Setup the CRC environment. This will create the ~/.crc directory if it does not already exist.
crc setup - Configure the virtual machine, as described above.
- Set the CPUs
crc config set cpus 5 - Set the Memory
crc config set memory 14305 - Set the pull secret:
crc config set pull-secret-file <pull-secret.txt>
- Set the CPUs
- Review configuration settings. We can only configure the resources before we start a new OpenShift cluster. If you wish to change them later, you must first delete the existing cluster and then change the configuration.
crc config view - Start the installation
crc start - Get a cup of coffee!
- Prepare your environment
eval $(crc oc-env)
Optionally, you can access the OpenShift console at this point by running
crc consoleand then login to OpenShift by choosingkube:adminand using the providedkubeadmincredentials.
Part 2 - Install Ansible Tower
Before you begin the Ansible Tower installation, be aware that Ansible Tower installation requires and depends on Ansible being installed locally. If you do not have Ansible locally installed, the Ansible Tower installer will attempt to install the bundled version of Ansible for you.
My recommendation is to prepare your local Ansible installation yourself (use perhaps the pyenv tool and create a clean Python virtual environment with Ansible).
For further info see the Ansible Tower software requirements.
Download
Let’s start by getting the latest Ansible Tower setup bundle.
- Download the latest version of the Ansible Tower installation bundle for OpenShift
wget https://releases.ansible.com/ansible-tower/setup_openshift/ansible-tower-openshift-setup-latest.tar.gz - Extract the contents
tar xvf ansible-tower-openshift-setup-latest.tar.gz - Change directory into installation folder
cd ansible-tower-setup-*
Inventory
We now need to edit the inventory file variables to configure the installation.
Here is the overview of the variables that need to be changed. The RED marked variables are required and the BLUE marked variables are only required for a specific install option described below.
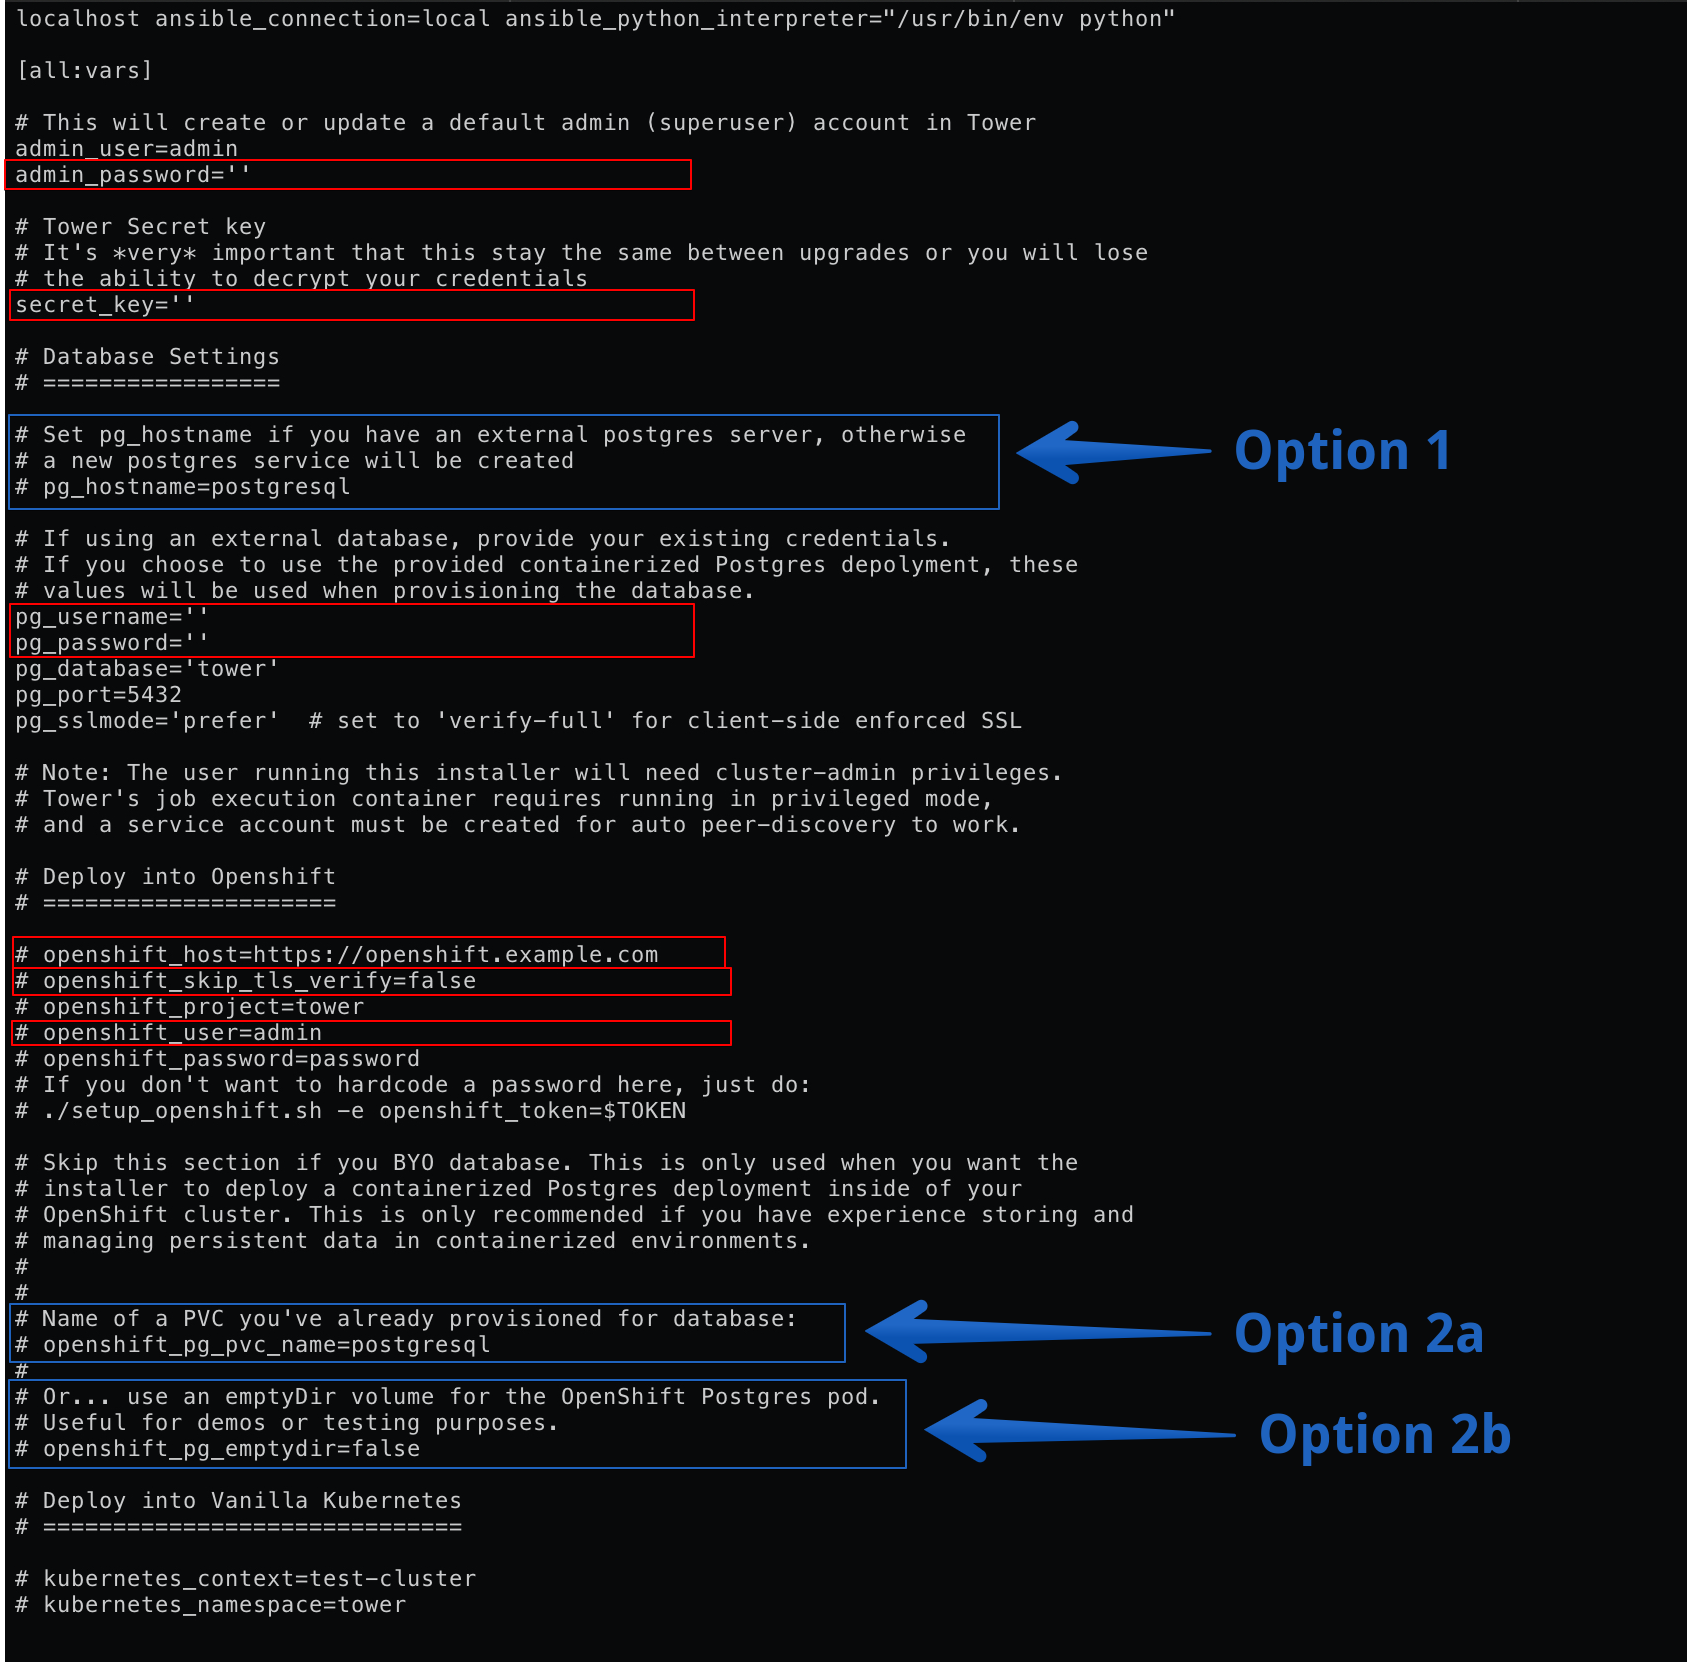
Let’s set the required variables in RED:
- Ansible Tower Credentials
admin_passwordis the password for the Tower admin usersecret_keyis a manually generated key string of your choice
- PostgreSQL Credentials
pg_usernameis the manually set username for postgrespg_passwordis the manually generated password for postgres
- OpenShift
openshift_hostis the OpenShift host that is created by thecrctool, typicallyhttps://api.crc.testing:6443openshift_skip_tls_verifyshould be set to True in our case sincecrctool creates self-signed certificatesopenshift_usershould be set tokubeadminor another admin user you created
The installation of Ansible Tower consists of two pods: Ansible Tower and PostgreSQL. You only need to decide on how PostgreSQL is installed. For the purposes of simply installing Tower for dev/test reasons you should use Option 2a (see below) that will quickly get you started.
Option 1: Externally Managed Database
With this option, PostgreSQL is not installed by the Tower installer, but rather it is installed separately and before the Tower install. It can be inside or outside of the OpenShift cluster. Tower installer is simply configured to point at the PostgreSQL instance. For typical installations this is the recommended option.
For this option, you need to set the following variables in the inventory file:
pg_hostnameshould be set with the name of the postgres hostname
Ensure that pg_username and pg_password are set to the existing user and password on your PostgreSQL instance.
Option 2a: Tower Managed Database, with Persistent Data
With this option, PostgreSQL is installed by the Tower installer in OpenShift using a manually pre-created Persistent Volume Claim (PVC).
For this option, you need perform the following tasks:
- Login as admin
oc login -u kubeadmin -p abc-123-password https://api.crc.testing:6443 - Create a new project
oc new-project tower -
Define our Persistant Volume Claim (PVC) of 20 Gi by creating
postgres-nfs-pvc.yml:kind: PersistentVolumeClaim apiVersion: v1 metadata: name: postgresql spec: accessModes: - ReadWriteOnce resources: requests: storage: 20Gi -
Create the PVC within OpenShift
$ oc create -f postgres-nfs-pvc.yml persistentvolumeclaim "postgresql" created - Edit the Ansible Tower
inventoryfile and set the following variable to the PVC name:openshift_pg_pvc_name=postgresql
Option 2b: Tower Managed Database, with Non-Persistent Data
With this option, PostgreSQL is installed by the Tower installer in OpenShift using an emptyDir volume that Tower creates for you. More info can be found here.
For this option, you need to set the following variables in the inventory file:
openshift_pg_emptydir=true
Install
Now we are ready to finally start the Ansible Tower installation.
- Set an environment variable for the OpenShift password:
export OPENSHIFT_PASSWORD=my-password - Install Ansible Tower using extra variable to provide the password:
./setup_openshift.sh -e openshift_password=$OPENSHIFT_PASSWORD - Get another coffee!
- Once done, you should check the health of the pods to ensure they are running
oc get pods
Part 3 - Access Ansible Tower
To access Ansible Tower use either the GUI or command line to get the URL.
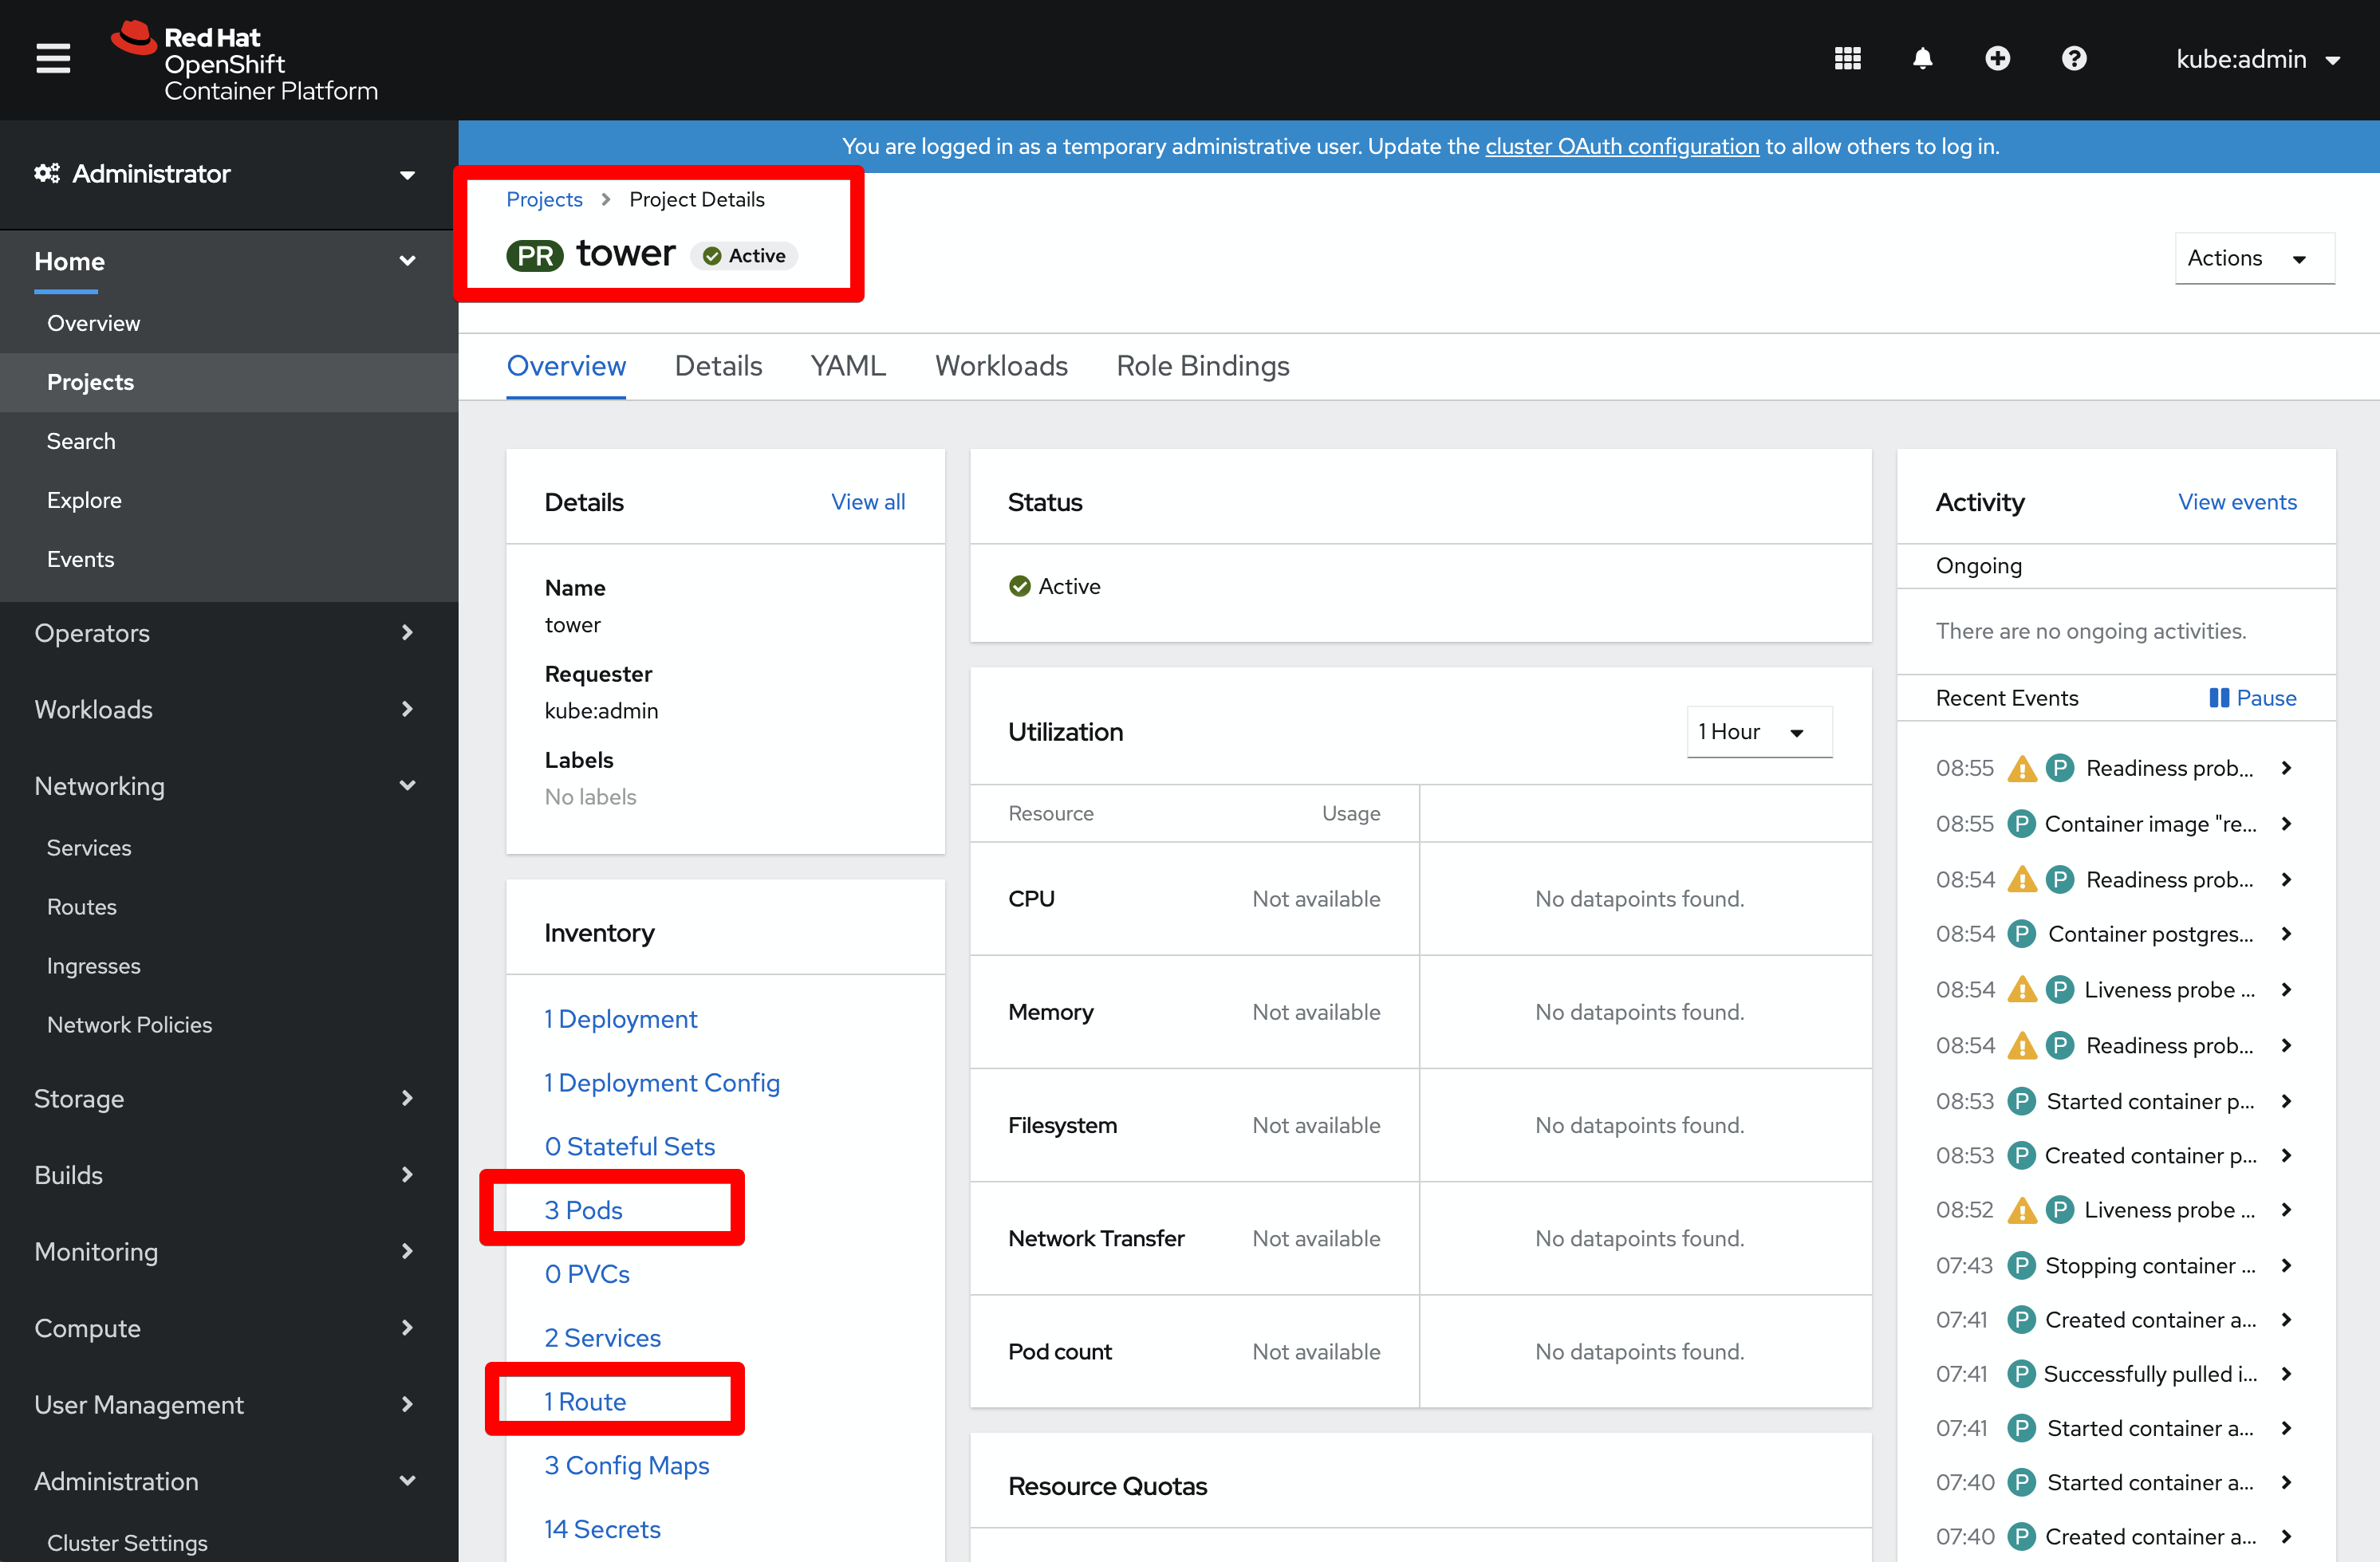
- Using OpenShift GUI:
- Open the OpenShift console:
crc console - Login by selecting
kube:adminand using the credentials - Navigate to
Projects - Select
towerproject - Navigate to
Routein the Project Details page - Navigate to the URL shown in the
Locationcolumn and drilldown on it - New tab opens up with Ansible Tower
- Open the OpenShift console:
- Using Command Line
- Change current project:
oc project tower - Get routes:
oc get routes - Use the value under the
HOST/PORTcolumn as the URL for Ansible Tower - Navigate to the URL in your browser
- Change current project:
- Login using the
admincredentials you defined in theinventoryfile for Tower installer - Import your Tower license
- Start having fun with Ansible Tower
Adjusting Ansible Tower Resource Requirements
Ansible Tower installation creates a tower pod with four containers that perform different functions. Each container is configured with specific resource requirements. For a diagram of the pod and containers see this page. These resource settings for CPU and memory can be found inside the install folder:
# Change directory to Ansible Tower installation folder
$ cd ansible-tower-openshift-setup-*
# Get all resource settings for Ansible Tower
$ grep request ./roles/kubernetes/defaults/main.yml

web_mem_request: 1
web_cpu_request: 500
task_mem_request: 2
task_cpu_request: 1500
redis_mem_request: 2
redis_cpu_request: 500
memcached_mem_request: 1
memcached_cpu_request: 500
You can override these settings by using one of the following methods:
- Override the variables by adding them at the end of the Tower installation
inventoryfile and install or re-install Tower using these new values. - Override the OpenShift Deployment object yaml definition within OpenShift after Tower has already been installed and re-deploy the pod with the new values.
- Get the deployment
oc get deployments - Describe the deployment
oc describe deployment ansible-tower - Change the deployment settings
- Save new settings
- Terminate the existing pod (this will automatically spin up a new pod with the new deployment definition)
- Get the deployment
I would recommend only adjusting the task_mem_request and task_cpu_request variables since they have the most impact on how tasks are performed within Ansible Tower.
More information on “Resource Requests and Request Planning” can be found here
Remote Shell
If you wish to take a look under the hood of one of the deployed pods, simply establish a Remote Shell to a container within the pod. You can use the following example to get the list of containers and connect to one of them.
# Get list of containers for all pods in the tower namespace
$ oc get pods -n tower -o jsonpath='{range .items[*]}{"POD: "}{.metadata.name}{"\n containers: "}{.spec.containers[*].name}{"\n\n"}{end}'
POD: ansible-tower-5b6dc4547b-dstpf
 containers: ansible-tower-web ansible-tower-task ansible-tower-redis ansible-tower-memcached

POD: postgresql-1-deploy
 containers: deployment

POD: postgresql-1-ffqw2
 containers: postgresql

# Remote shell into the `ansible-tower-web` container that sits inside the `ansible-tower-5b6dc4547b-dstpf` pod
$ oc rsh -c ansible-tower-web ansible-tower-5b6dc4547b-dstpf
sh-4.2$
Extras
Some extra tips.
- You can find the
crcsettings and logs in your home directory at~/.crc/. - You can get more information on the PostgreSQL container pod used by Ansible Tower from here. This will also help you to create your own PostgreSQL instance that you can have Ansible Tower installer reference instead of it creating its own instance.
Upgrading
To upgrade the crc tool, simply re-download it and overwrite existing local instance.
To upgrade Ansible Tower, simply download the latest version of the bundle archive, prepare it and run it against your existing instance inside OpenShift.
References
Some further information:
- Ansible Tower Admin Guide - OpenShift Deployment and Configuration
- Introducing Red Hat CodeReady Containers
- OpenShift Dedicated 4 Documentation
- CodeReady Containers - source code repository
- How to install Ansible Tower on Red Hat OpenShift
- Trying out CRC (Code Ready Containers) to run OpenShift 4.x locally
- Run Ansible Tower or AWX in Kubernetes or OpenShift with the Tower Operator
- Red Hat OpenShift 4 on your laptop
- Red Hat OpenShift 4 on your laptop: Introducing Red Hat CodeReady Containers
- OpenShift Admins Guide to jsonpath